


Note: These features and configurations are available only to users with the appropriate permissions. For further details, refer to our Help Center article on Roles and permissions.
What’s supported in SleekFlow
- Sync contacts and order details from VTEX to SleekFlow
- Sync your VTEX product catalog
- Manually send product or payment links in conversations
If a feature isn’t listed here, it’s currently not supported in our integration with VTEX.
Integrating VTEX with SleekFlow enhances your ecommerce workflows by syncing customer and order data between platforms. Automate messages, manage campaigns, and design advanced flows using real-time VTEX data in SleekFlow. Streamline operations, improve customer engagement, and drive better results across your sales and support teams.
In this article, we’ll guide you through connecting and managing your VTEX integration with SleekFlow.
What can you do with the VTEX integration
VTEX integration supports a range of ecommerce use cases by syncing real-time data into SleekFlow. Here are a few examples:
- Automatically send personalized WhatsApp messages after a customer places an order
- Trigger delivery updates when an order status changes
- Segment and re-engage customers who haven’t purchased in a while
- Launch a broadcast campaign to customers who purchased specific products
- Alert sales teams when a high-value order is received
Connecting a VTEX store
Note: VTEX authorization expires every 6 months. If your store is disconnected, you’ll need to reconnect it to resume syncing.
You can follow the steps below to connect your VTEX store to SleekFlow:
- Click the
icon on the left-sided navigation bar to go to the Integration page
- In the Integration page, under “E-commerce” section, you will find “VTEX integration”
- Click “Connect” to go to the “Connect VTEX” page
- In the “Connect VTEX” page, you will see the information required beforehand to set up the VTEX store connection, including
- A valid VTEX account
- Admin access to your VTEX store
- Admin permission to retrieve your AppKey and AppToken
- Once you have everything ready, click “Continue”
- A pop-up modal will appear
- You will be required to fill in the VTEX store URL, AppKey, and AppToken of your VTEX store. You can follow the steps in this VTEX’s documentation to find your AppKey.
- Once the required information is filled, click “Create”
- Once your VTEX store is connected to SleekFlow successfully, you will be redirected to the VTEX integration dashboard


Setting up data sync flows in Flow Builder
Once you have successfully connected your VTEX store to SleekFlow, you will be required to set up a flow in Flow Builder to sync contacts, orders, and abandoned carts from VTEX to SleekFlow. This is a compulsory step to bring your VTEX records into SleekFlow to enable other features, like automated workflows and target campaigns.
You can follow the steps below to set up data sync flows in Flow Builder:
- In the Flow editor, select a VTEX trigger as the trigger of the data sync flow. You can choose one of the following triggers:
-
Loop through VTEX orders
Best for scheduled syncs or importing existing orders. This trigger loops through all matching orders in bulk based on your defined filters. -
VTEX orders created
Use this when you want the flow to run as soon as a new order is created in VTEX — such as a new order or a new customer profile. -
VTEX orders updated
Choose this if you want the flow to trigger when an existing order is updated — for example, when an order status changes from “processing” to “delivered.”
-
Loop through VTEX orders
- Once you have selected the trigger, choose the VTEX store that you want to use in this flow
- Next, you will be required to select the type of records you want the flow to respond to:
- Order: Syncs order-related details (e.g., product name, order total, delivery status)
- Once you have selected the type of records, you can then add filters to the trigger node to narrow your data scope. For example:
- Only trigger when an order’s status = “Shipped”
- Only include contacts with a valid phone number
Once you have set up your VTEX data sync trigger node, you can continue setting up the flow by using the action nodes available in Flow Builder
Example use cases
Here are some common ways teams use VTEX trigger nodes to automate ecommerce workflows in Flow Builder:
-
Send a WhatsApp reminder after order creation
- Use “VTEX orders created” trigger to send a personalized follow-up message right after a customer places an order.
-
Notify a team member when a high-value order is placed
- Use” VTEX orders created” triggers with a filter like “orderTotal > 1000” and add an “Assign to teammate” or “Internal note” node.
-
Update order status via message when shipping is confirmed
- Use “VTEX orders updated” trigger with a filter like “orderStatus = Shipped”, then send an automated message with the delivery details.
-
Import past orders into SleekFlow for segmentation
- Use “Loop through VTEX orders” triggers to bulk sync historical data and trigger downstream actions like tagging or contact updates.
View synced VTEX order data in SleekFlow
Once your VTEX store is connected and order data is synced via Flow Builder, SleekFlow will automatically create a custom object schema for VTEX Orders. This lets you manage and reference order data across flows, campaigns, and contact profiles.
Synced order records are:
- Linked to their corresponding contact profiles
- Available for search
- Viewable in both the “Data” section and contact info panel in the Inbox
You can follow the steps below to view synced VTEX order data:
- Go to “Data” page by clicking on the
icon in the left navigation bar
- On the left panel, locate your connected VTEX store
- Click on the VTEX store you’ve synced records from
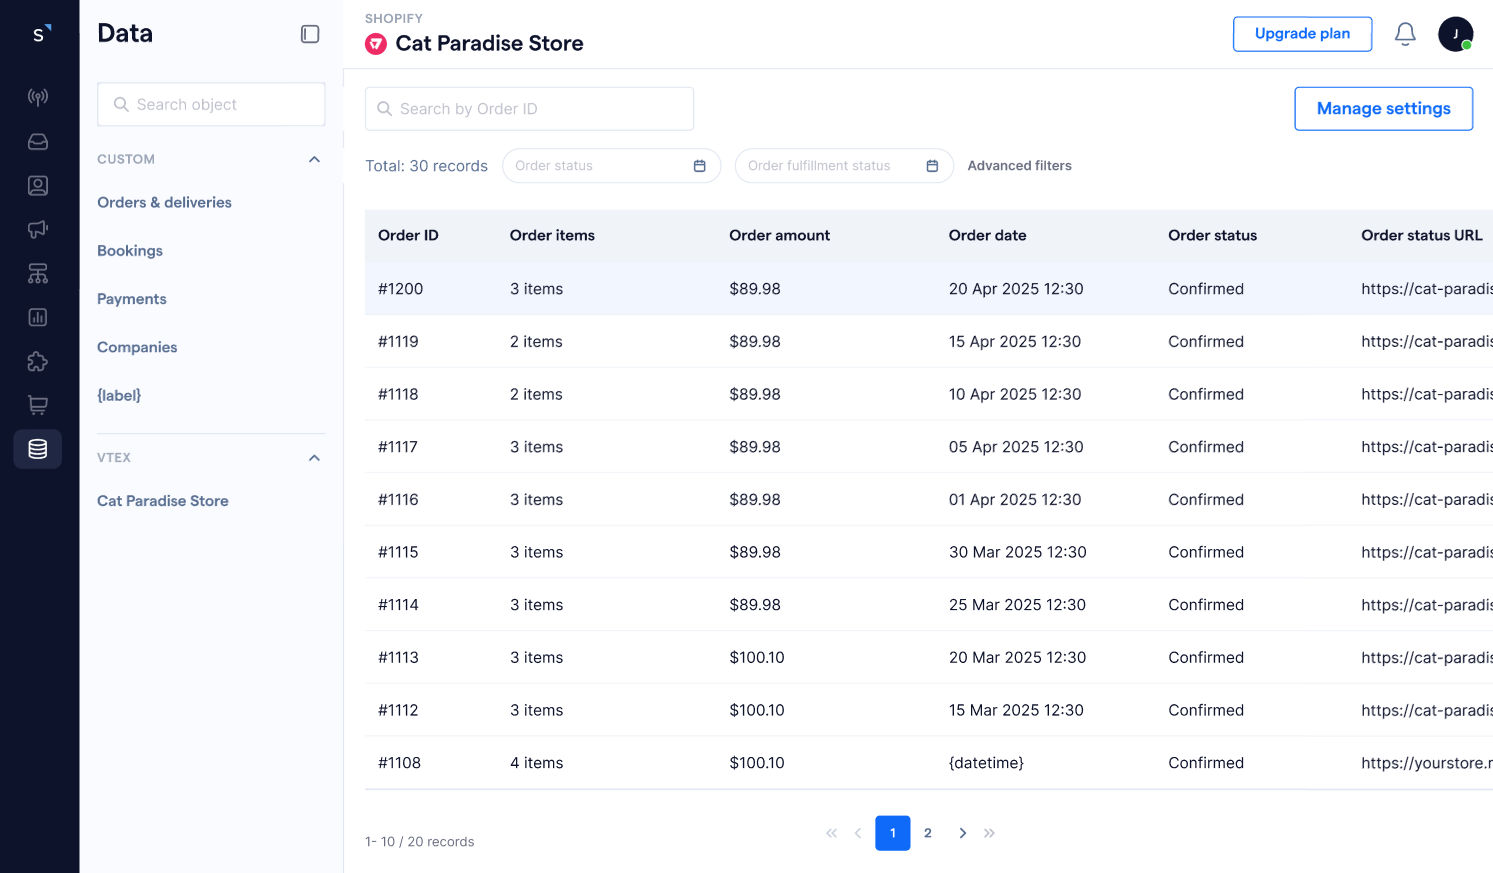
- You’ll see a list of synced orders and their schema (order fields) — automatically created based on the data retrieved
- You can click on a specific entry to open the full details of that order record
- On this page, you can search order details by keywords or filters to find specific orders
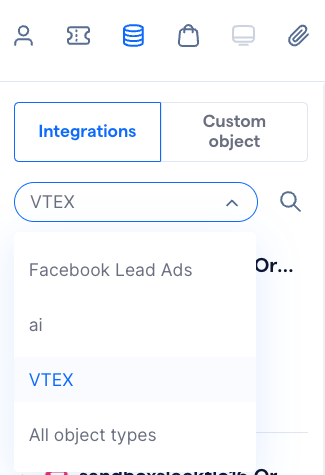
You can also view related order details when opening a contact profile in the Inbox. If the contact has any synced VTEX orders, you can then click on the icon in the contact info panel, and filter out any VTEX records under “Integrations”.
Managing your connected VTEX stores
ℹ️ You need to have at least one VTEX store to SleekFlow to review and manage the connected VTEX store.
You can review and manage all of your connected VTEX store in the VTEX dashboard. To access the dashboard, you can follow the steps below:
- Click on the
icon on the left-hand navigation bar to go to the “Integrations” page
- Under “E-commerce” section, you will find the “VTEX” integration
- Click on “Manage integration” and you will be redirected to the VTEX dashboard

Renaming your VTEX store
To rename your VTEX store, follow the steps below:
- In the VTEX dashboard, hover on the VTEX store you would like to rename
- Click on the
button, and select “Rename”
- Rename the account in the “Store name” text box
- Click “Rename” and your store name will be updated


By renaming the store, you will only rename the store name displayed in SleekFlow. The change will not be applied to the store name on VTEX.
Reconnecting your VTEX store
VTEX requires periodic reauthorization for security purposes. If your integration becomes disconnected — usually every 6 months — you’ll need to reconnect your VTEX store to resume syncing data and automations.
You can follow the steps below to reconnect your VTEX store
- In the VTEX dashboard, locate the store that requires reconnection
- Click on the
icon next to the “Disconnected” status
- A pop-up modal will appear
- You will be required to fill in an updated set of AppKey and AppToken
- Once you have filled in the updated AppKey and AppToken, click “Reconnect”


Deleting your VTEX store
Deleting a VTEX store from SleekFlow is permanent and cannot be undone. Any flows built with this store, as well as synced contacts and objects, will remain in your workspace — but they may trigger errors if the store connection is missing.
You can follow the steps below to delete a connected VTEX store:
- In the VTEX dashboard, hover on the VTEX store you would like to delete
- Click on the
icon, and select “Delete”
- A warning modal will appear. Click “Delete” to confirm the deletion


Editing store settings
Once your VTEX store is connected, you can customize how product and payment information is shown in conversations by editing the store settings.
You can follow the steps below to access your store settings:
- Go to the “Commerce” page by clicking on the
icon in the left navigation bar
- Select your connected VTEX store
- You will land on the “Store settings” page, which includes 2 tabs: Display and Payment
Display tab
The Display tab controls how your product catalog appears in the Inbox.
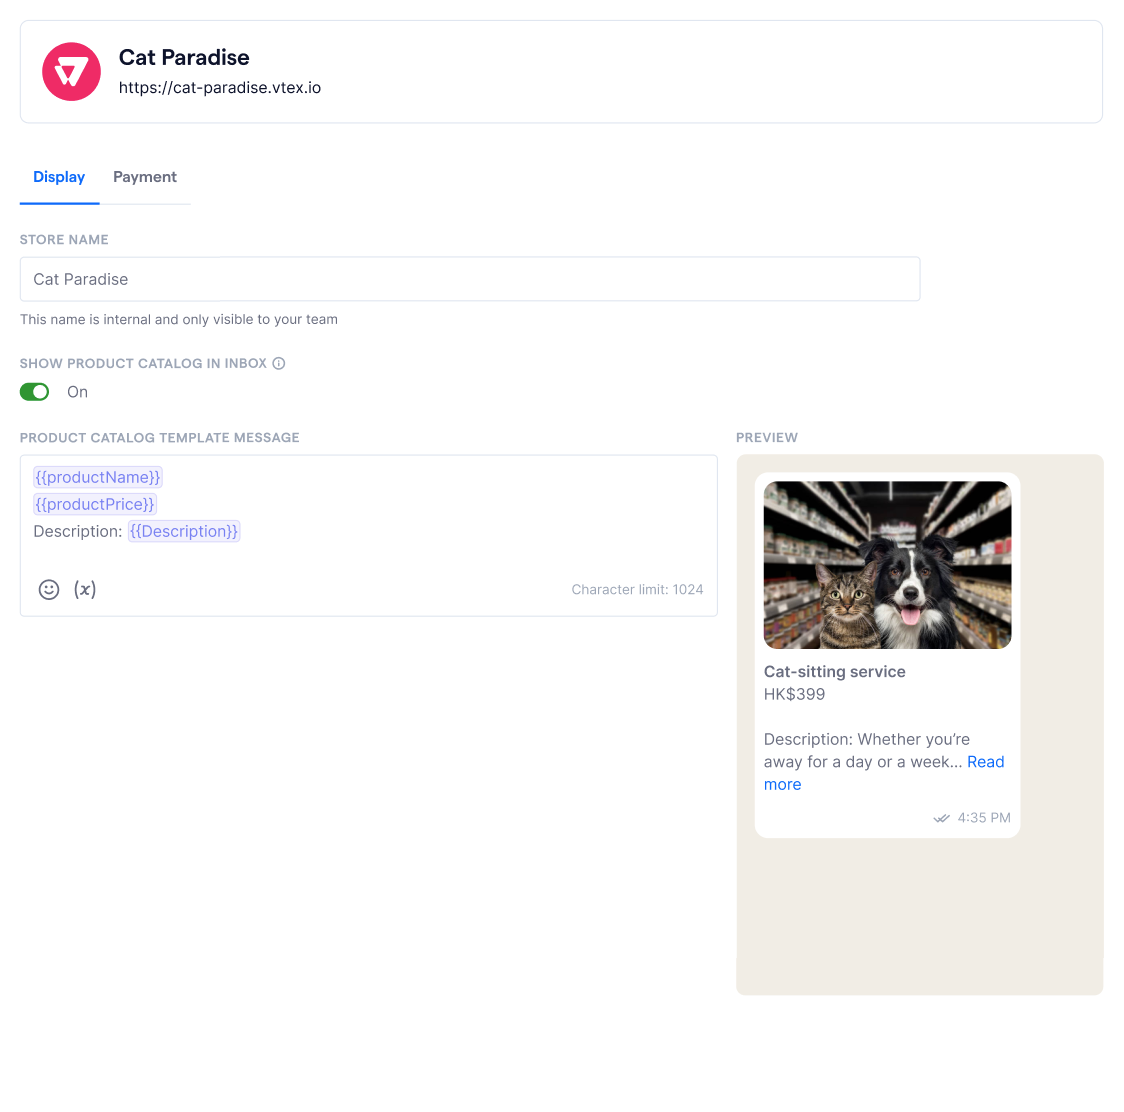
To enable catalog sharing, turn on the “Show product catalog in Inbox” toggle. This allows your teammates to browse and send VTEX product cards directly within conversations.
You can also customize the Product catalog template message to define how each product will be introduced in chat. The message supports the following dynamic variables to pull in product details:
- {{productName}} – product name
- {{productPrice}} – product price
- {{Description}} – product description
- {{ProductLink}} – product page link
As you type, a live preview on the right shows how the message will appear to customers — helping you check formatting, line breaks, and variable placement in real time.
Note: The product image is displayed by default and cannot be edited.
💬 To share products in Inbox:
Open any conversation, click the Product icon, and select a product from your synced VTEX catalog. The shared message will follow your customized template format.
Follow the steps below to share product link:
- Open the conversation with the customer you want to share products with
- In the message textbox, locate the
icon
- You will find a list of connected stores. Locate the VTEX store you wish to share product links from and click the store
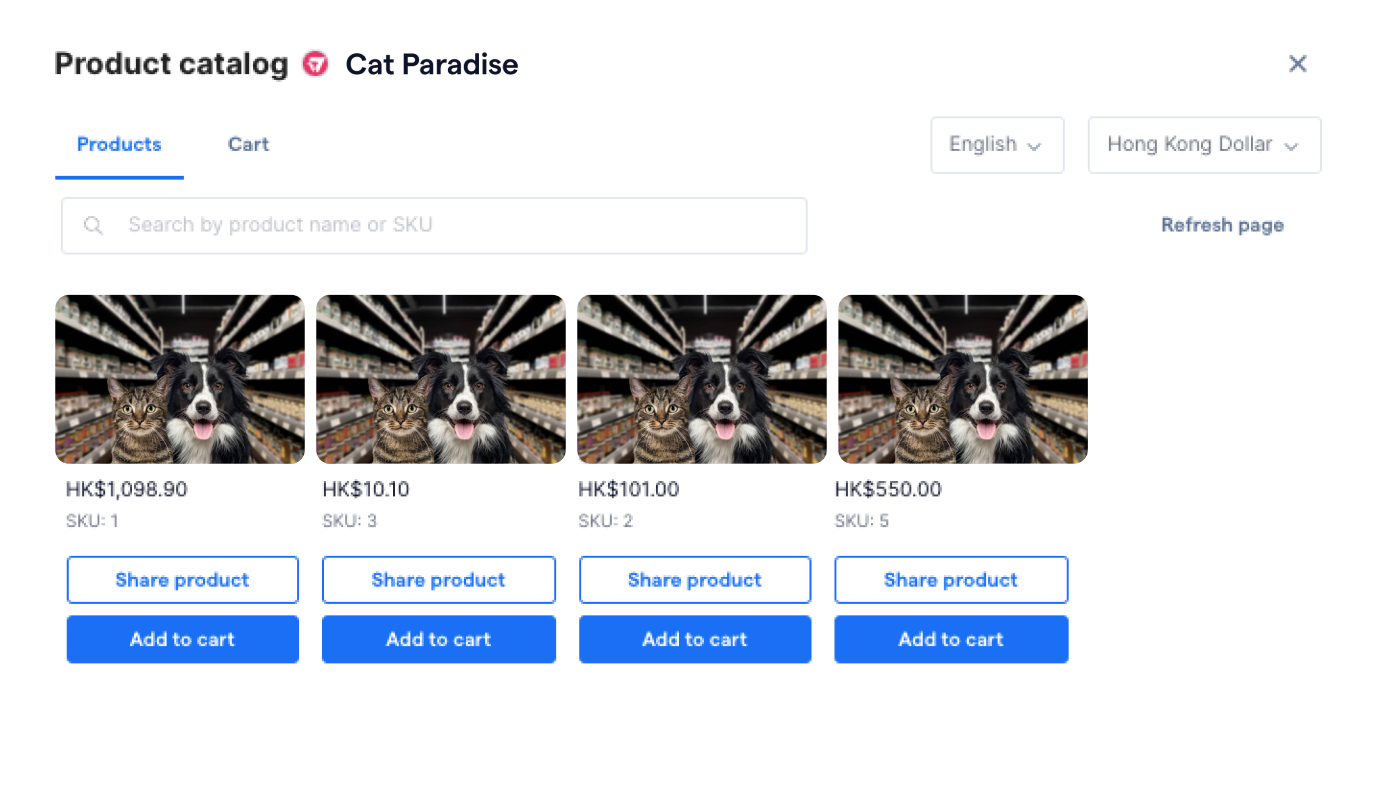
- A pop-up modal will appear, where you will see the product catalog of your connected VTEX store
- Once inside the catalog:
- To share a single product immediately, click Share product.
- To build a cart, click Add to cart on any item. This moves the product to the Cart tab.
- You can adjust the quantity, remove items, or continue browsing to add more products.
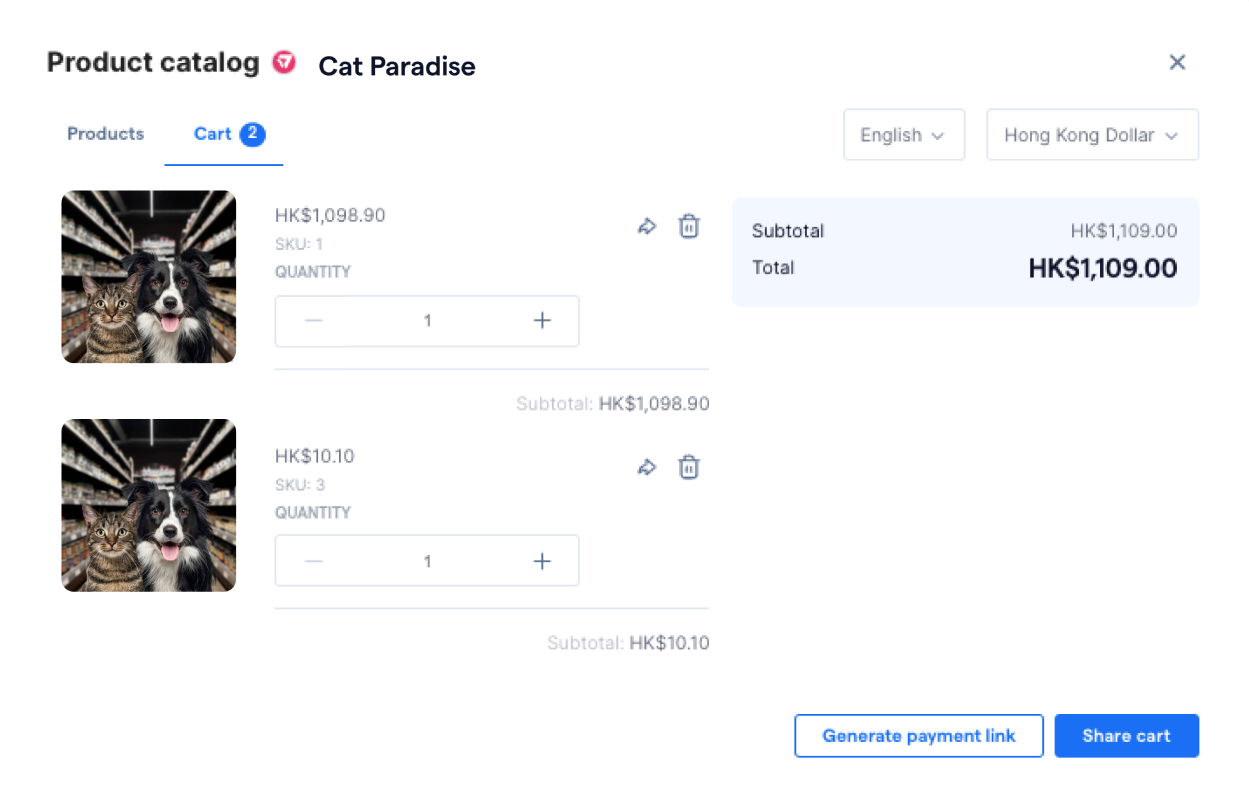
- Switch to the Cart tab to review your selections and subtotal.
- From there, you can choose to:
- Share cart — send the cart details as a message using your catalog message template.
- Generate payment link — create a checkout link using VTEX, which you can then send to the customer.

Payment Tab
The Payment tab controls how you share checkout links with customers during conversations.
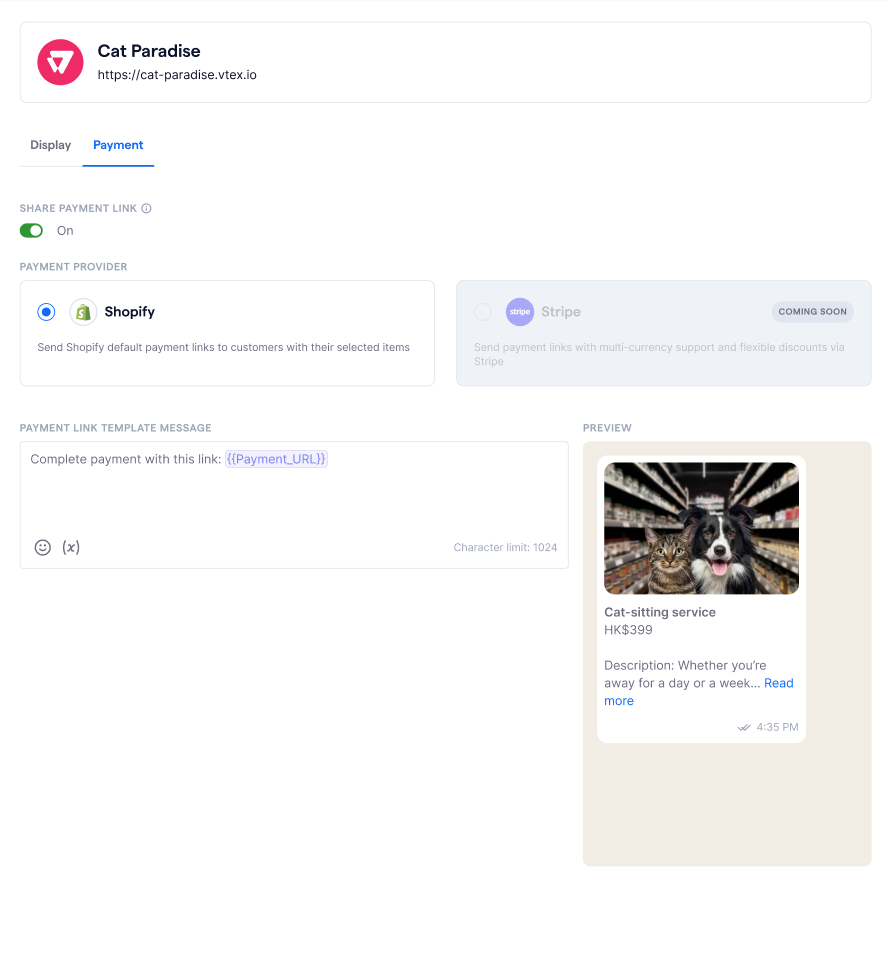
-
Toggle on “Share payment link”: This enables your team to send checkout links directly in conversations.
- Select a payment provider: Choose VTEX as your payment provider. Stripe is also listed but currently marked as “Coming soon.”
-
Customize the message template: Use the Product catalog template message field to define how the payment message appears.
- Include {{payment_url}} to automatically insert the checkout link.
- Add your own message before or after the variable as needed.
- Preview your message: A real-time preview will show how the message will appear in chat, including any product images and formatting.
Share payment link in Inbox
You can generate and send a VTEX payment link directly from a conversation. This allows customers to check out with selected items right from chat.
Follow the steps below to share a payment link:
- Open the conversation with the customer you want to send a payment link to
- In the message box, click the
- Select the VTEX store you want to use — this will open the product catalog modal
- Click Add to cart on the products the customer wants to purchase
- Go to the Cart tab to review item details and pricing. You can adjust quantities or remove items here
- Click “Generate payment link”
- SleekFlow will generate a checkout link using VTEX and insert it into the chat using your saved payment message template
Frequently asked questions
Can I connect multiple VTEX stores to SleekFlow?
Yes. You can connect and manage multiple VTEX stores within the same workspace. Each store will have its own integration dashboard and settings.
Will deleting a store remove past data synced to SleekFlow?
No. Deleting a VTEX store will not remove any previously synced data. Custom objects, order records, and contact information will remain in SleekFlow. However, flows or automations that relied on the deleted store may stop working or show errors.