


The data masking feature allows you to hide or encrypt sensitive details in incoming messages, contact information, custom object properties, and records through pattern masking using regular expressions (regex). This powerful tool helps maintain confidentiality and ensures compliance with data protection regulations. By implementing data masking, you can safeguard personal information while still leveraging the data you need for analysis and decision-making. In this article, we will guide you on how to effectively use data masking to enhance your data security and privacy.
This feature is currently available by request only. Contact our Sales team if you’re interested in enabling it for your company workspace.
Note: These features and configurations are available only to users with the appropriate permissions. For further details, refer to our Help Center article on Roles and permissions
Why does data masking matter?
Data masking is essential for several key reasons:
- Enhanced security: Data masking minimizes the risk of unauthorized access by obscuring sensitive information. This is particularly crucial in environments where data is shared among multiple users or systems.
- Regulatory compliance: Many industries are subject to strict data protection regulations. Data masking helps organizations comply with laws such as GDPR and HIPAA by ensuring that personal data is not exposed unnecessarily.
- Risk mitigation: In the event of a data breach, masked data can help limit the exposure of sensitive information, thereby reducing potential liability and financial losses.
How does data masking work?
Data masking replaces sensitive values with masked characters (for example, *) when data is viewed by certain users or returned by APIs.
SleekFlow supports two ways to mask data, depending on how much control and flexibility you need:
- Escolher se deseja mascarar e-mail ou número de telefone
- This option lets you quickly mask email addresses or phone numbers stored in contact data, without using regular expressions.
- You can:
- Choose whether to mask email or phone number
- Decide how much of the value is masked (full or partial)
- Control which user roles see masked values
- Optionally apply masking to API responses
- This setup is ideal if you want a guided, low-effort way to protect commonly sensitive contact information.
- Pattern masking using regular expressions (regex)
- Pattern masking allows you to define custom masking rules using regular expressions.
- With pattern masking, you can:
- Mask sensitive data in incoming messages, contact properties, custom objects, and API responses
- Create multiple masking patterns for different data types
- Apply masking selectively by location and user role
- This option is best suited for advanced or highly customized compliance requirements.
💡 In both methods, the original data is stored securely. Masking only affects how data is displayed or returned, not how it is stored.
What does it do?
-
Hides sensitive information: For example, if you configured a Hong Kong phone number regex pattern as the masking pattern, the feature can mask the customer phone number from view, changing
98769876to********. This ensures that sensitive information is not exposed to unauthorized users. - Maintains data structure: While the actual data is hidden, you can still see that the data is a phone number or an email address without revealing the real information.
- Customizable patterns: You can set up your own regex patterns for masking data based on your needs. Whether it’s hiding credit card numbers, email addresses, or other sensitive details, the feature allows you to define how data should be masked.
Setting up data masking
Access the “Data masking” page
To reach to the “Data masking” page, follow these steps:
- Click on your profile icon
 in the bottom left corner and select “Settings”
 - Under the “Company Settings” section, click “Data masking”
- You will be redirected to the “Data masking” page
Option 1: Mask email and phone number (simple setup)
Note:
Email and phone number are key contact properties and can only be masked once per workspace.
If a masking rule already exists for email or phone number, you won’t be able to create another one for the same property.
This option allows you to quickly mask email addresses or phone numbers stored in contact data, without creating regular expression (regex) patterns.
Use this setup if you want a guided way to protect commonly sensitive contact information while controlling which user roles can view unmasked data.
You can follow the steps below to mask email and phone number:
- In the “Data masking” page, click on the “Mask email and phone number” button on the top right corner
- A pop-up modal will appear

- Click on the “Contact property” dropdown and select masking either email or phone number

- Follow the steps in the next section to mask email or phone number
Masking email address
Once you have selected “Email” in the previous step, additional configuration fields will appear. Use these fields to define how email addresses should be masked and who can view the unmasked data.
Fill in the following fields in the modal:
-
Name
It is pre-filled as Email by default.
You can edit the name if needed. The name must be unique. -
Masking rule
Choose how the email address should be masked: -
Hide from
Select the user role(s) that should see masked email values.
Users in the selected roles will see masked email addresses in the platform. -
Apply masking in
This field is fixed as “Contacts” and cannot be changed.
Email masking applies to contact profiles, contact lists, and contact exports. -
(Optional) API response
Toggle API response to control email masking in API responses:- Off (default): APIs return unmasked email values
- On: APIs return masked email values
Once you have finished filling in the details, click “Mask” to save your settings. After saving, the email masking rule takes effect immediately.
Masking phone number
Once you have selected Phone number in the previous step, additional configuration fields will appear. Use these fields to define how phone numbers should be masked and who can view the unmasked data.

Fill in the following fields in the modal:
-
Name
- It is pre-filled as Phone number by default.
- You can edit the name if needed. The name must be unique.
-
Masking rule
Choose how the phone number should be masked:- Full phone number masking
Masks the entire phone number, including the country code.
Example: +852 9123 4567 → *********** - Partial phone number masking
Configure the following options:- Masked digits: Enter the number of digits to mask. The minimum value is 4.
- Start masking from:
- Back: Example: +852 9877 ****
- Front (after country code): Example: +852 **** 1234
- Front (including country code)
- Hide from
- Full phone number masking
- Select the user role(s) that should see masked phone number values.
Users in the selected roles will see masked phone numbers in the platform. -
Apply masking in
This field is fixed as Contacts and cannot be changed.
Phone number masking applies to contact profiles, contact lists, and contact exports. -
(Optional) API response
Toggle API response to control phone number masking in API responses:- Off (default): APIs return unmasked phone number values
- On: APIs return masked phone number values
Once you have finished filling in the details, click Mask to save your settings.
After saving, the phone number masking rule takes effect immediately.
Option 2: Create a masking pattern
You will need to create a masking pattern to mask information on SleekFlow.
To create a masking pattern, you can follow these steps below:
- Click. on the “Create new pattern” button on the right top of the page
- A “Create new masking pattern” modal will pop up and you can configure your masking pattern
- Below are the details for each field:
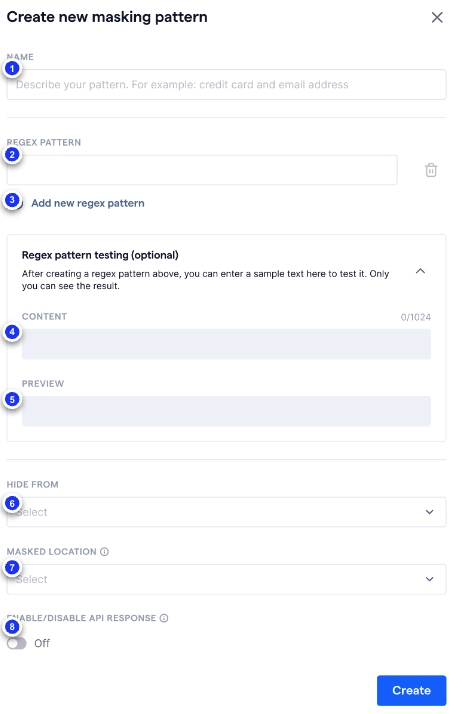
| # | Name | Details |
| 1 | Name | Provide a name for this pattern, masking it easy to reference in the future. |
| 2 | Regex pattern | Provide the regex pattern to mask the targeted text. You can find some common masking patterns we recommend here. |
| 3 | Add new regex pattern | Add an addition regex pattern if needed. |
| 4 | Content | Test the masking pattern by enter ample content in this field to ensure that the pattern masks the information as intended. |
| 5 | Preview | After entering sample content in the “Content ” field above, you can preview the masked content to check if the test input is masked as expected. |
| 6 | Hide from | Configure which role(s) will have the masking pattern applied. For example, when selecting “Staff", all users assigned to the “Staff" role in the workspace will have the relevant data masked for them. |
| 7 | Masked location | Configure the location where the masking pattern will be applied, such as incoming messages, contact properties, custom object. |
| 8 | Enable/Disable API response |
Configure whether data from API responses should be masked. For instance, if a masking pattern for phone numbers is applied to “contact properties”, and API response masking is enabled, phone numbers returned by any contact API will be masked. If you are using API integration/third party integration, you may also receive masked data. |
4. Once you have completed the configuration, you can click “Create” to create your new pattern
Edit a masking pattern
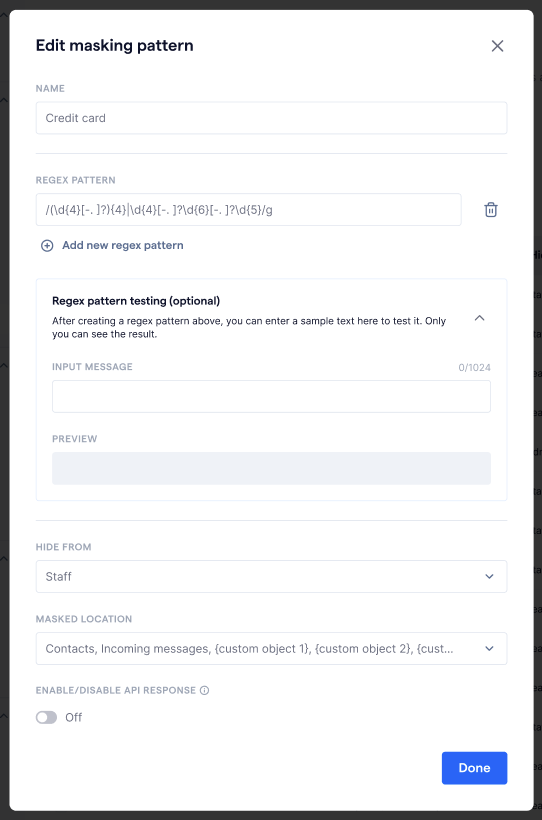
To edit a pattern, follow the steps below:
- Hover on the pattern you would like to edit
- Click on the
 icon, and a drop-down menu will appear
 - Select “Edit”, and a “Edit masking pattern” pop-up modal will appear
- Once you have updated the pattern. click “Done”. Your masking pattern will be updated
Delete a masking pattern
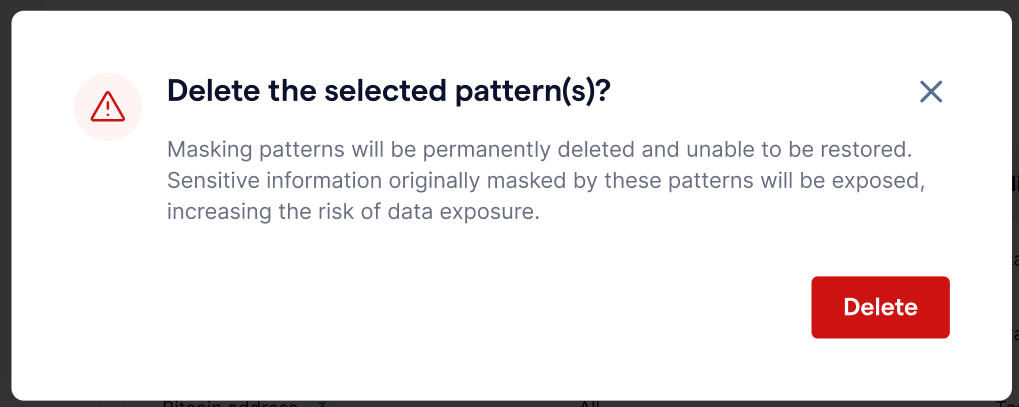
⚠️ Once you have deleted a masking pattern, all the previously masked data will be unmasked and will be visible to all users in your workspace. You will need to create a masking pattern again to mask the sensitive data.
To delete a pattern, follow these steps:
- Hover on the pattern you would like to delete
- Click on the icon, and a drop-down menu will appear
- Select “Delete”, a warning modal will appear. Click “Delete” to confirm the deletion
- The pattern will be deleted. All the previously masked data will now be unmasked.
Common masking patterns
SleekFlow’s ‘Data Masking’ feature provides you with the flexibility to customize the masking pattern based on your business needs, allowing you to protect sensitive data. Below are some common regex pattern examples you can use in SleekFlow.
Please note that this list includes common patterns available in SleekFlow and may not cover less common patterns.
Email address
Basic email regex
| Regex | ^[a-zA-Z0-9._%+-]+@[a-zA-Z0-9.-]+\.[a-zA-Z]{2,}$ |
| Description | Matches most standard email formats, such as exmaple@domain.com
|
Allow subdomains
| Regex | ^[a-zA-Z0-9._%+-]+@[a-zA-Z0-9.-]+\.[a-zA-Z]{2,}(?:\.[a-zA-Z]{2,})?$ |
| Description | Matches emails with subdomains, like user@mail.example.com
|
Allowing special characters
| Regex | ^[a-zA-Z0-9!#$%&'*+/=?^_{|}~.-]+@[a-zA-Z0-9.-]+.[a-zA-Z]{2,}$` |
| Description | Matches emails that include additinal special characters, such as example+test@domain.com
|
Credit card number
Basic credit card number
| Regex | ^\d{16}$ |
| Description | Matches a standard 16-digit credit card number without spaces or dashes |
Credit card number with dashes
| Regex | ^\d{4}-\d{4}-\d{4}-\d{4}$ |
| Description | Matches credit card numbers in the format 1234-5678-9012-3456
|
Credit card number with spaces
| Regex | ^\d{4} \d{4} \d{4} \d{4}$ |
| Description | Matches credit card numbers fomratted with spaces, like 1234 5678 90123 3456
|
Flexible credit card number (spaces/dashes)
| Regex | ^(\d{4}-?\d{4}-?\d{4}-?\d{4})$ |
| Description | Matches credit card numbers with optional dashes or spaces, like 1234 5678 9012 3456 or 1234-5678-9012-3456. |
American Express
| Regex | ^3[47]\d{13}$ |
| Description | Matches American Express card numbers, which are 15 digits long and start with 34 or 37
|
Visa
| Regex | ^4\d{12}(\d{3})?$ |
| Description | Matches Visa card numbers, which are typically 13 or 16 digits long and start with 4
|
Mastercard
| Regex | ^5[1-5]\d{14}$ |
| Description | Matches MasterCard numbers, which are 16 digits long and start with 51 through 55
|
Discover Card
| Regex | ^6(?:011|5\d{2})\d{12}$ |
| Description | Matches Discover card numbers, which can start with 6011 or 65 and are 16 digits long. |
Diners Club
| Regex | ^3(?:0[0-5]|[68]\d)\d{11}$ |
| Description | Matches Diners Club card numbers, which are 14 digits long and can start with 300 to 305, or 36 or 38
|
JCB Card
| Regex | ^(?:2131\d|1800\d|35\d{3})\d{11}$ |
| Description | Matches JCB card numbers, which can start with 2131, 1800, or 35 and are 16 digits long. |
Phone number
Hong Kong
| Regex | ^(\+?852)?[56789]\d{3}\d{4}$ |
| Description | Matches HK phone numbers without hyphens, where the optional country code +852 can precede the number, such as 51234567
|
| Regex | ^(\+?852)?[56789]\d{3}-\d{4}$ |
| Description | Matches HK phone numbers specifically with a hyphen, allowing for the optional country code +852, as seen in 5123-4567
|
Singapore
| Regex | ^(\+?65)?(8|9)\d{7}$ |
| Description | Matches Singapore mobile numbers strictly starting with 8 or 9 without spaces or hyphens, and it allows for the optional country code +65, for example, 91234567
|
| Regex | ^(\+?65)?(6|8|9)\d{7}$ |
| Description | Matches Singapore mobile numbers starting with 6, 8, or 9, permitting the optional country code +65, such as 61234567
|
Malaysia
| Regex | ^(\+?60)?1[0-9]{1}\d{7,8}$ |
| Description | Matches Malaysian mobile numbers without hyphens, where the optional country code +60 may precede the number, like 0123456789
|
| Regex | ^(\+?60)?1[0-9]{1}-\d{7,8}$ |
| Description | Matches Malaysian mobile numbers with a hyphen, allowing the optional country code +60, for instance, 012-3456789
|
Indonesia
| Regex | ^(\+?62)?(8\d{1,3}-?\d{7,})$ |
| Description | Matches Indonesian numbers starting with 8 (mobile) and allows an optional country code +62, as in 0812-34567890
|
| Regex | ^(\+?62)?[2-9]\d{2}-?\d{7,}$ |
| Description | Matches landline numbers starting with 2 to 9, permitting the optional country code +62, for example, 021-12345678
|
United Arab Emirates
| Regex | ^(\+?971)?(5[0-9]|7[0-9])\d{7}$ |
| Description | Matches UAE phone numbers starting specifically with 5 or 7, with the optional country code +971, such as 0501234567
|
| Regex | ^(\+?971)?(6|7|8|9)\d{8}$ |
| Description | Matches UAE numbers starting with 6, 7, 8, or 9, allowing for the optional country code +971, for example, 0612345678
|
Brazil
| Regex | ^(\+?55)?(11|[1-9][0-9])\d{9}$ |
| Description | Matches Brazilian mobile numbers with 9 digits after the area code, allowing for the optional country code +55, like 11987654321
|
| Regex | ^(\+?55)?(11|[1-9][0-9])\d{5}-\d{4}$ |
| Description | Matches Brazilian numbers formatted with a hyphen, permitting the optional country code +55, for example, 11 91234-5678
|
Identity card
Hong Kong (HKID)
| Regex | ^[A-Z]{1,2}\d{6}\(\d\)$ |
| Description | Matches HKID formats like A123456(7) or B123456(8)
|
Singapore (NRIC)
| Regex | ^[STFG]\d{7}[A-Z]$ |
| Description | Matches Singapore NRIC formats like S1234567D or T1234567A
|
Malaysia (MyKad)
| Regex | ^\d{12}$ |
| Description | Matches MyKad numbers, which are typically 12 digits long, such as 123456789012
|
Indonesia (KTP)
| Regex | ^\d{16}$ |
| Description | Matches KTP numbers, which are 16 digits long, such as 1234567890123456
|
United Arab Emirates
| Regex | ^\d{9}$ |
| Description | Matches UAE ID card numbers, which are typically 9 digits long, such as 123456789
|
Brazil (RG)
| Regex | ^\d{1,2}\.\d{3}\.\d{3}-\d{1}$ |
| Description | Matches Brazilian RG formats like 12.345.678-9
|