


ℹ️ Roles and permissions are only accessible to users with the Super admin role
⚠️ Please note that roles and permissions are currently under limited release and may not be available to you yet.
The Roles and permissions module enables workspace admins to customize access controls, aligning them with their business’ requirements. By tailoring roles and permissions, companies can enhance security, streamline workflows, and safeguard company resources effectively.
Understanding roles and permissions
What is a permission?
A permission defines a specific set of rights granted to a user. Permissions determine:
- What actions a user can perform (e.g., edit a channel, view analytics)
- What data a user can access within the workspace
What is a role?
A role acts as a container for permissions. Each role can include multiple permissions, and users assigned to a role automatically inherit all the associated permissions. Roles simplify user management by grouping permissions into predefined access levels tailored to business needs.
What are default roles?
SleekFlow provides four pre-defined roles to manage user access and permissions:
1.Super admin
- Full access to all features and settings across the workspace
ℹ️ Every SleekFlow company account automatically comes with a Super admin role that cannot be deleted.
When a new SleekFlow company account is created, the system automatically assigns the Super admin role to the user who created the account. This ensures that there is always at least one user with full access to manage the workspace and its settings.
2. Admin
- Access all contacts, conversations, and modules
- Manage user roles and set login credentials
3. Team admin
- View all contacts and conversations within their own team but cannot access information from other teams
4. Staff
-
Can only access their assigned contacts and conversations, any other unassigned conversations
Managing permissions
The following sets of permissions exist within the SleekFlow platform, each tied to a specific module or functionality:
Channel management
| Permission | Description |
| Access channels page | View all connected channels and their details |
| Contact channels | Add new messaging channel connection |
| Edit channel settings | Modify settings for connected channels, including rename channels, import conversations, edit Live Chat Widget settings, view QR code, copy WhatsApp profile, update WhatsApp profile etc |
| Delete channels | Disconnect a connected channel from the platform |
| View messaging template settings | Access all messaging templates for WhatsApp related channels |
| Create messaging templates | Add new messaging templates to connected channels |
| Edit messaging templates | Edit and bookmark existing messaging templates for WhatsApp related channels |
| Delete messaging templates | Delete existing messaging templates |
| Manage channel billings | View and manage payments and billing for connected channels, include manual top-up and auto top-up settings |
| Manage Message opt-in settings | Enable or disable WhatsApp message opt-in configurations and update settings |
| Manage QR code settings | Configure QR code for users and teams, including message pre-filled text and auto-reply preference |
Inbox
| Permission | Granular controls | Description |
| View conversations | Assigned to themselves | View conversations where the user is an assignee, collaborator, or mentioned within the inbox |
| Assigned to their team | View all conversations that have been assigned to any of the teams they are in, or assigned to any other user (as contact owner or collaborator) who is part of any team they are in. | |
| All assigned conversations | View all conversations within the inbox that have been assigned to a user or a team. | |
| All unassigned conversations in their team | View all conversations that have been assigned to one of the teams they are in, but without an assignee yet. | |
| All unassigned conversations | View all conversations within the inbox that have not been assigned to a user or a team | |
| Send messages | Assigned to themselves | Send messages out in conversations where they are either the assignee, collaborator, or mentioned within the inbox |
| Assigned to their team | Send messages out in conversations that have been assigned to any of the teams they are in, or assigned to any other user (as contact owner or collaborator) who is part of any team they are in. | |
| All assigned conversations | Send messages out to conversations that have been assigned to a user or a team. | |
| All unassigned conversations in their team | Send messages out in conversations that have been assigned to one of the teams they are in, but have not been assigned to an assignee yet. | |
| All unassigned conversations | Send messages out to conversations that have not been assigned to a user or a team | |
| Assign conversations | Assigned to themselves | Assign or unassign to themselves as either the assignee or collaborator of conversations. |
| Assigned to any users | Assign or unassign other users as the assignee or collaborator of conversations | |
| Send product links | Share product catalog links with customers in the Inbox | |
| Send payment links | Create and send Stripe payment links to contacts |
Inbox settings
| Permission | Description |
| Manage Inbox settings | Configure and manage settings that determine how the Inbox behaves for the entire team |
| View saved replies settings | View settings of existing reply message templates configured for use in the Inbox |
| Create saved replies | Create new saved reply message templates for use in the Inbox |
| Edit saved replies | Edit the content and settings of existing savedreply message templates |
| Delete saved replies | Delete existing saved reply message templates |
Company settings
| Permission | Description |
| Access Company details page | Access the Company details settings page |
| Edit Company details | Edit details and information about the company |
| View users | View a list of all users with accounts on the platform within the company workspace |
| Invite users | Invite new users to create an account and join the workspace |
| Edit users | Edit details and settings of existing users |
| Edit user status | Edit the active/inactive statuses of other users |
| Edit user security settings | Edit the security settings of other users (e.g. reset password, revoke 2FA setup) |
| Delete users | Delete user accounts from the company's workspace |
| View teams | View a list of teams created within the company's workspace |
| Create teams | Create a new team within the company's workspace |
| Edit teams | Edit the details and settings of existing team |
| Delete teams | Delete existing teams from the company's workspace |
| View masking patterns | View the company's masking patterns |
| Create masking patterns | Create new masking patterns within the company's workspace |
| Edit masking patterns | Edit masking patterns within the company's workspace |
| Delete masking patterns | Delete masking patterns within the company's workspace |
Security settings
| Permission | Description |
| View security settings | View the security settings within the company's workspace |
| Edit security settings | Set up and edit the security settings within the company's workspace |
Plans & Billings
| Permission | Description |
| Access plan summary | View a summary of the plan and other services the company is currently subscribed to, along with the details of the subscriptions |
| Manage plans and billings | Manage and edit company’s subscription plan, including upgrading, downgrading, adding/removing add-ons, and viewing invoices |
Contact management
| Permission | Granular controls | Description |
| Access Contacts page | - | Access and view the details of all contacts in the Contact module where they are either assigned as the owner or a collaborator |
| View contact details | Assigned to themselves | View details of contacts assigned to the user themselves |
| Assigned to their team | View details of contacts assigned to the user’s team | |
| Assigned to others | View details of contacts assigned to other users (for Team Admin roles only). | |
| Unassigned contacts | View details of contacts that do not have an assigned owner | |
| Create contacts | - | Create new contacts in the workspace |
| Edit contacts | Assigned to themselves | Edit details of contacts owned by or collaborated on by the user themselves |
| Assigned to their team | Edit details of contacts assigned to the user’s team | |
| Assigned to others | Edit details of contacts assigned to other users | |
| Unassigned contacts | Edit details of unassigned contacts | |
| Assign contacts | Assigned to themselves | Assign owners or collaborators to contacts |
| Assigned to their team | Assign the user’s team as the owner or collaborator of a contact | |
| Assigned to others | Assign other users as the owner or collaborator of a contact. | |
| Delete contacts | Assigned to themselves | Delete contacts assigned to the user themselves |
| Assigned to their team | Delete contacts assigned to the user’s team | |
| Assigned to others | Delete contacts assigned to other users | |
| Unassigned contacts | Delete unassigned contacts | |
| Add/ remove contacts to list | - | Add or remove contacts from a contact list |
| Export contacts | - | Export contact data for external use |
| View contact lists | - | View all contact lists created in the company's workspace |
| Create contact lists | - | Create new contact lists |
| Edit contact lists | - | Edit the details and configurations of existing contact lists |
| Delete contact lists | - | Delete existing contact lists |
Contact settings
| Permission | Description |
| View contact labels | View the existing contact labels |
| Create contact labels | Create new contact labels that can be applied to contacts |
| Edit contact labels | Edit configurations of existing contact labels |
| Delete contact labels | Delete existing contact labels |
| View contact properties | View the full list of contact properties configured within the workspace |
| Create contact properties | Create a new contact property |
| Edit contact properties | Edit configurations of existing contact properties |
| Delete contact properties | Delete existing contact properties |
| Access recently deleted contacts page | Recover deleted contacts or permanently delete contacts |
Broadcasts
| Permission | Description |
| Access Broadcasts page | View existing broadcasts that have been created |
| Create broadcasts | Create new broadcasts |
| Publish broadcasts | Publish and execute a broadcast |
| Delete published broadcasts | Delete broadcasts that have already been published |
Flow Builder
| Permission | Description |
| Access Flow Builder page | View existing flows that have been created on Flow Builder |
| View flow details | Access and view the flow's details |
| Create flows | Create new flows |
| Edit flows | Access all features on the flow's details page that allows them to modify existing flows |
| Publish flows | Publish flows to execute their defined actions based on the configured triggers and conditions |
| Unpublish flows | Unpublish flows to pause the execution of their defined actions based on the configured triggers and conditions |
| Delete flows | Delete flows to remove the record and the defined action of the flows |
Analytics
| Permission | Description |
| View Conversation Analytics dashboard | Access and view Conversation dashboards within the Analytics module |
| Export Conversation Analytics | Export data from the Conversation Analytics dashboard |
| Manage conversation segment settings | Edit, create and delete segments within the Conversation Analytics page |
| View Sales dashboard | Access and view Sales dashboards within the Analytics module |
Integrations
| Permission | Description |
|
Access Integrations page |
Access the Integrations module, including the integration disconnection alert settings |
Commerce
| Permission | Description |
|
Access Commerce page |
Access the Commerce Hub module |
Ticketing
| Permission | Description |
| Access Ticketing page | Access the Ticketing page and Ticketing in Inbox |
| Create tickets | Create tickets within the workspace |
| Delete tickets | Delete tickets within the workspace |
| Manage Ticketing settings | View and manage Ticketing settings |
Custom objects
| Permission | Description |
| Access Data page | View all records stored in each existing custom object |
| Create custom object records | Create custom object records |
| Edit custom object records | Edit custom object records |
| Delete custom object records | Delete custom object records |
| Manage custom objects settings | View all created custom objects and their corresponding configurations |
SleekFlow AI
| Permission | Description |
| Access SleekFlow AI page | Access all AI settings and related features |
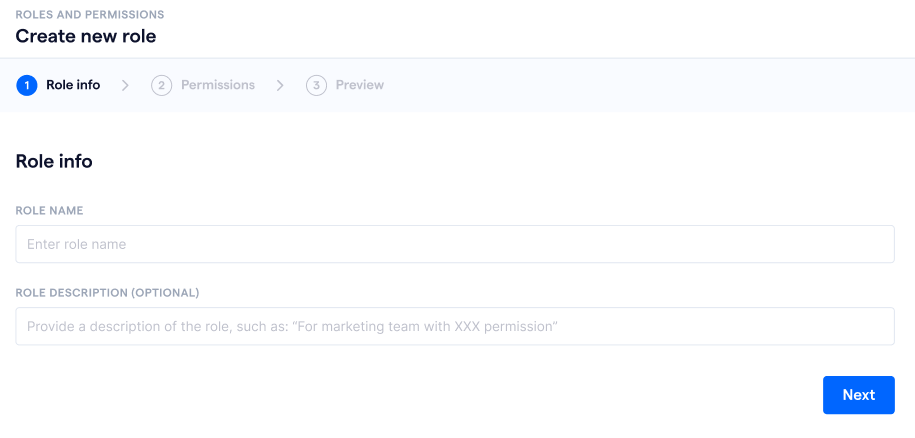
Creating a role
Follow these steps to create a new role:
- Click the icon in the bottom left corner to open the “General Settings” page
- Under “Company settings”, click “Roles and permissions”
- Click “Create new role"
-
In the “Create new role’ flow, configure the following details:
- Role name
- Role description
- Set of permissions to assign to the role
- Complete the “Create new role” flow to successfully create your new role
Duplicating an existing role
You can create a new role by duplicating an existing one. The newly created role will inherit all the details of the original role.
To duplicate a role:
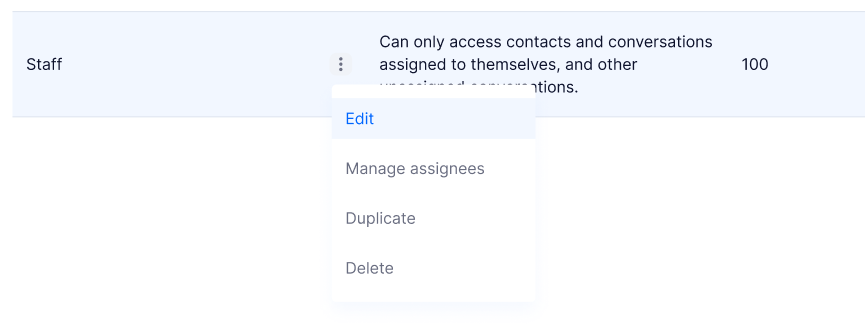
- Within the “Roles and Permissions” settings page, hover over the role you want to duplicate
- Click the icon that appears next to the role’s name
- Select “Duplicate”
- The selected role will then be duplicated
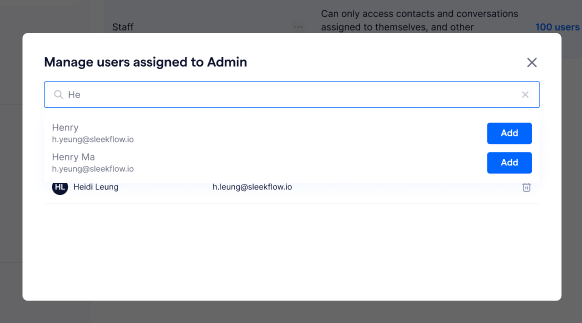
Assigning users to roles
To assign users to a specific role:
- In the “Roles and permissions” settings page, hover over the role you want to assign users to
- Click the icon next to the role’s name
- Select “Manage assignees”
- In the pop-up window that appears, search for and add the users you want to assign to this role
Assigning users to role from user details page
Users can also be assigned to a role directly from their user details page. Refer to this article to learn more about the user details page.
Editing a role
To edit an existing role:
- In the “Roles and permissions” settings page, hover over the role you would like to edit
- Click the icon next to the role’s name
- Select “Edit”
-
You can edit the following details in the edit flow
- Role name
- Role description
- Set of permissions to be assigned to the role
- Click “Save changes” to confirm your updates
Deleting a role
To delete a role:
- In the “Roles and permissions” settings page, hover over the role you would like to delete
- Click the icon next to the role’s name
- Select “Delete”
-
In the pop-up window that appears, confirm the action to delete the role
FAQs
What happens if I delete a role currently assigned to users?
When a role is deleted, all users assigned to that role lose the associated permissions. To avoid disruption, reassign users to a new or existing role before deleting the current role.
Is there a limit to the number of roles I can create?
You can create up to 20 roles per company.