


All trigger nodes require setting up in a node form, where you can further specify the parameters for a flow to be triggered. In this article, we will guide you on how to set up every “Integration” trigger node so you can initiate your flows based on expected circumstances.
Webhook received
⚠️ The "Webhook received" trigger will only be available for Premium and Enterprise plan users
The "Webhook received" trigger allows you to enroll contacts into a flow when SleekFlow receives a webhook matching the configurations set within the trigger’s node form.
Set up the "Webhook received" trigger node form by following the steps outlined below:
- Activate webhook received trigger node
- Set up your webhook
- Specify contact identifier
-
Configure response persistence
Activate “Webhook received” trigger node
To activate the "Webhook received" trigger node:
-
Click on the node to open up its form, which will appear on the right side of the screen
-
Click the "Generate" button within the form to activate the node, generating the necessary sections that enable you to configure the trigger
-
Once you click "Generate", the following new sections will appear within the form:
- Setup
- Identify contacts
-
Save response

The following segments of this article outline the purpose of each section and how to configure them.
Set up your webhook
After the "Webhook received" trigger has been activated, the first section displayed is "Setup". This section provides the information required for you to set up the necessary connectivity between your external system and SleekFlow, so your external system can send a valid webhook to trigger a flow enrollment.
You’ll need to use the following 3 items that are are provided within the "Setup" section to set up a proper webhook connection from your external system to SleekFlow:
- Webhook URL - This is the URL your external system needs to send the webhook to in order for it to be received by SleekFlow
- Webhook trigger ID - This ID allows the SleekFlow system to map the webhook to the flow, ensuring contacts are properly enrolled. Please provide this in your webhook headers.
- Validation token - This allows the SleekFlow system to verify the webhook is coming from you. Please provide this in your webhook headers.

You can either set up the webhook connection by including the above parameters in your HTTP request header, or you can embed the necessary parameters in a single URL and copy the URL to best suit your integration setup needs.

Within the "Setup" section there is also a "Post request" code sample to help you configure your HTTP request to properly send the webhook to SleekFlow.

The information provided in the "Setup" section will enable you to configure a valid webhook to be sent from your external system to SleekFlow, triggering your desired flow enrollments.
Specify contact identifier
The "Identify contacts" section allows you to configure how the system will map the webhooks it receives to corresponding contacts that are enrolled into the flow.

This section has 2 fields you must fill in:
-
Contact payload key - This field allows you to specify which variable within the JSON webhook payload received by the system should be used to cross-check against the contact records in SleekFlow. We recommend using a variable that is a unique identifier for a contact, e.g., contact ID, phone number, or email. Please use the JSON dot notation here to specify which field from the webhook payload the system should extract and reference.
💡 JSON dot notation explainer
The JSON dot notation is a way to specify a particular field or value within a nested data structure like JSON. It allows you to navigate through the structure by indicating the path to the desired field using dot-separated keys.
Format:
The JSON dot notation begins with a $., followed by all the field names listed in sequential order to navigate through the nested data structure to get to your target field. Each field name specified in the notation is separated by a dot (e.g. $.key1.key2.key3)Example:
For the payload specified below, the phone number field would be represented using the JSON dot notation like so: $.data.profile.phone
{
"data": {
"id": "12345",
"name": "Bob Chan",
"profile": {
"email": "bob@sleekflow.io",
"phone": "85298007899"
}
}
-
Identifier type - This drop-down menu allows you to select which contact property the system will cross-check your specified contact identifier against within your SleekFlow account’s contact records. Select between 3 options:
- Contact ID (I.e. the unique UUID of each contact provided by SleekFlow)
- Phone number
-
Email
💡 Note on non-existent contacts
There may be instances where the contact identifier provided in the JSON webhook payload does not correspond to an existing contact within your SleekFlow account.
When "Phone number" or "Email" is selected as your "Identifier type", an additional toggle - "New customer enrollment" - is provided to handle such cases.
If "New customer enrollment" is toggled on, a phone number or email address provided in the webhook payload that cannot be matched with an existing contact on SleekFlow will automatically have a new contact record created with the provided contact identifier. The newly created contact will then be enrolled into the flow.

Configure response persistence
The "Save response" section allows you to specify data points within the received JSON webhook payload to save and use later as a variable in the flow. This will provide you with more flexibility in creating tailored interactions with your contacts through dynamic data.
This section allows you to add key-value pairs for values within the webhook you want to save as a variable, as well as provide variable names to save them under. Each key-value pair consists of the following 2 fields:
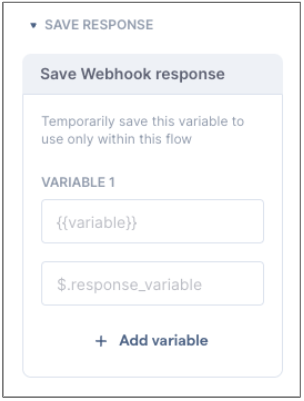
- {{variable}} - Specify the variable name that the system will use to store the data extracted from the webhook payload under. You can use this variable in subsequent condition and action nodes within the flow when you want to reference the values extracted from the webhook payload. Please specify your desired variable name in this field using double curly braces (i.e. {{variable_name}})
- $.response_variable - This field allows you to specify the variable to extract values from within the JSON webhook payload received by the system. Please use the JSON dot notation here to specify which field from the webhook payload the system should extract (refer to JSON dot notation explainer).